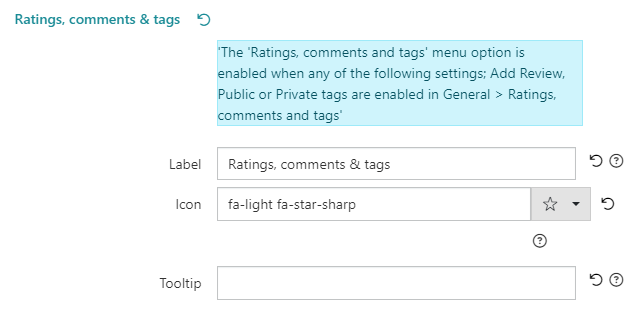
Display information panel in OPAC Configurator for 'Ratings, comments and tags' section
In the My account tab of the OPAC HTML Configurator, most of the sub-sections in the Menu options section have a checkbox to Enable the display of the relevant menu option. However, since the 'Ratings, comments and tags' menu option is displayed at the OPAC based on the configuration of the Ratings, comments & tags section on the General tab, a new information panel has been added to ensure clarity for staff.
Add Discovery Platform timeout page settings
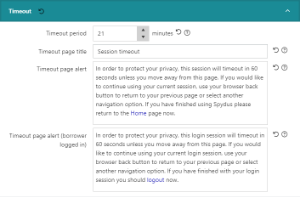
Spydus now provides the feature to set the timeout period for OPAC with an alert message and title. Once a borrower is idle for the given time span, an alert will be displayed for 60 seconds, and then the user at OPAC will be redirected to the homepage.
Staff users can set different alert messages for guest users and borrowers for at the Discovery Platform. To configure timeout settings:
- Navigate to Maintenance > OPAC & Enquiry > OPAC HTML Configurator.
- On the General tab, expand the Timeout section.
- Set the Timeout period (in minutes).
- Set the Timeout page title and Timeout page alert/s.
- When the Timeout period elapses, the Timeout page alert message will display for visitors who are not logged in
- When the Timeout period elapses, the Timeout page alert (borrower logged in) message will display for visitors who are logged in
- Click Save or Save & Close.
Add option to display announcements on all pages at Discovery Platform
Announcements can be used to add a banner message to the Discovery Platform.
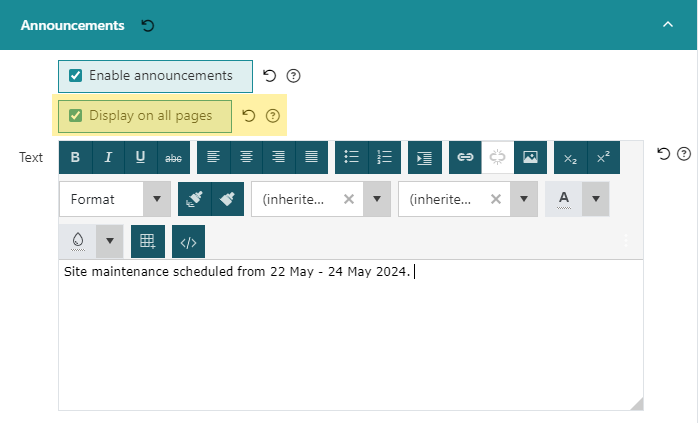
Previously, the Announcements would only be displayed at the homepage of the Discovery Platform. This new feature introduces the Display on all pages checkbox for Announcements, which allows staff users to set the announcement to display at all pages of the Discovery Platform.
To set the Display on all pages option:
- Navigate to Maintenance > OPAC & Enquiry > OPAC HTML Configurator.
- On the General tab, expand the Announcements section.
- Check the Enable announcements checkbox.
- Compose the announcement using the rich text editor. Allowed content includes; HTML (using the < / > icon), text, images, links
- Set the state of the Display on all pages checkbox as required
- Click Save or Save & Close.
|
If Enable announcements is checked, and Display on all pages is unchecked, announcements will display only on the home page. |
'Login failed response page' customisation settings
With the new 'Login failed responses page' section of the OPAC HTML Configurator, library staff can personalise and configure the messages displayed at the Discovery Platform when borrower login fails for the following reasons:
- Entering the wrong borrower ID/username or password
- Attempting to login with a borrower ID that has been suspended, cancelled, or has borrower traps or alerts applied that prevent OPAC login
- Performs SSO login, but no matching Spydus account exists for that SSO ID
To set up the failed login responses for OPAC, staff users can do the following:
- Navigate to Maintenance > OPAC & Enquiry > OPAC HTML Configurator.
- On the General tab, expand the Login section.
- In the Login section, locate the Login failed response page subsection.
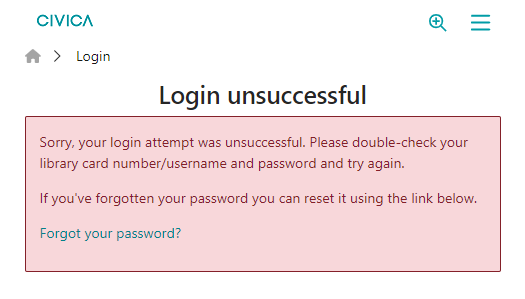
- Set the page Title that will be displayed when a borrower's login attempt fails
- This will be displayed at the top of the page body, above the message e.g. 'Login unsuccessful' in the below screenshot
- Set the responses for the Invalid ID or password message, the Invalid account status message, and Spydus account not found when SSO message.
- These messages may be composed in rich-text, using HTML and links if required (e.g. link to password reset page, library admin contact info, etc)
- Click Save or Save & Close.
Consolidate 2FA configurator settings in a single section
Previously, 2FA settings were split between the General and Login sections of the OPAC HTML Configurator. This new feature consolidates the 2FA settings under the Login section.
To configure 2FA settings:
- Navigate to Maintenance > OPAC & Enquiry >OPAC HTML Configurator.
- On the General tab, expand the Login section.
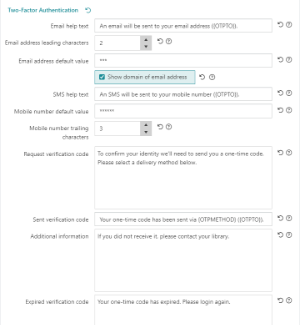
- In the Login section, scroll to the Two-Factor Authentication section.
- Fill out the details as required, such as email help text, email address leading characters, SMS help text, mobile no. default value etc.
- Click on Save or Save & Close.
Rename and reorganise 'OPAC & Enquiry' menu options in Maintenance
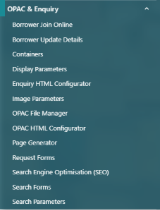
A number of the options under the OPAC & Enquiry in Maintenance have been renamed, and re-ordered alphabetically.
|
Here is the list of the renamed features:
|
Add support for multiple custom website searches
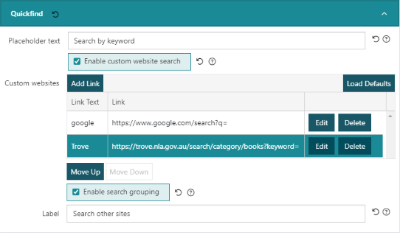
In previous versions, it was only possible to create one 'Custom search' in the quickfind menu. This new feature allows staff to add multiple sites with link text and URLs, allowing users to to search other library websites from the Spydus Discovery Platform (searches will be launched at the target site in a new browser tab).
To add customer website search/es:
- Navigate to Maintenance > OPAC & Enquiry > OPAC HTML Configurator
- Select Search tab and expand Quickfind section.
- Check Enable custom website search.
- Click Add Link
- Enter Link text - This will be the label for the custom search in the quickfind dropdown menu e.g. Trove
- Enter the Link - This is the search URL, which Spydus will automatically append the query term to e.g. https://trove.nla.gov.au/search/category/books?keyword=
- Click OK
- To add additional custom searches, repeat step 4
- Optionally, check Enable search grouping checkbox, and set the Label beneath it
- If enabled, any custom searches will be grouped under the Label in the Quickfind dropdown menu
- Click Save or Save & Close.
Amend display of 'Show item value' settings in Notice Parameters for printed notices
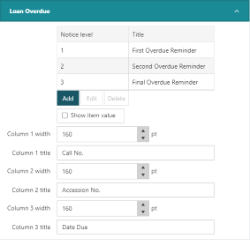
For print notice types that use the 'Show item value' parameter, the display of the related settings has been amended to clarify the use of these parameters.
These parameters are accessible on the Print Settings tab in Maintenance > Circulation > Notice Parameters. The notice types affected by these changes are:
- Loan Claimed Returned
- Loan Claimed Never Borrowed
- Loan Long Overdue
- Loan Reported Lost
- Loan Lost
- Loan Overdue
When the Show item value parameter is disabled, settings will be shown for the width and titles of the item details table.
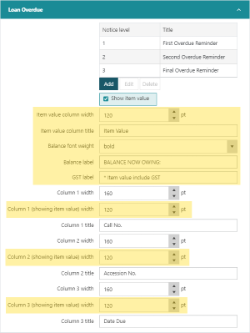
When the Show item value parameter is enabled, an extra column will be added to the item table in a printed notice, displaying the value of that item. In this case, it may be preferred to resize the columns in the table. Additional settings for the table column widths when showing the item value will be displayed when Show item value is enabled. The addition fields are:
- Item value column width - the point width of the Item value column
- Item value column title - the title text of the item value column
- Balance font weight - the font styling of the Balance label text (the balance being the total item value of all items in the table)
- Balance label - the text label describing the balance field (e.g. 'Total value:')
- GST label - the text label describing the tax field
- Column x (showing item value) width - the point width of the nominated column when the item value is being shown
Record locking enhancements
Previously, the Record Locking utility (Maintenance > General > Record Locking) showed only the IRN of the locked record and the user code of the user that the record is locked to. With this feature, the list now shows:
- The Date/Time stamp when the record was locked
- The Staff name (not code) that the record is locked to
- The Record IRN of the locked record
- The record Format of the locked record (e.g. Order, Invoice etc)
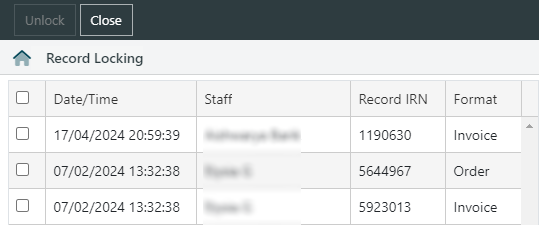
|
In a consortium, the Record Locking utility also now filters only to records locked at the local institution. |
Add Meta Pixel analytics to OPAC
The Analytics section in the General tab of the OPAC HTML Configurator now offers the option to enable Meta/Facebook Pixel analytics tracking at the OPAC.
To enable this functionality requires a valid Pixel ID.
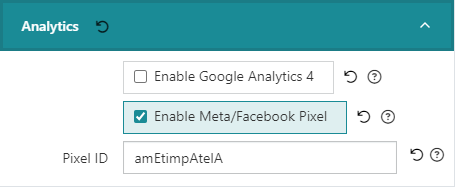
Add option to configure records per page in OPAC HTML Configurator
In previous versions of Spydus, the 'Number of records per page' parameter allowed staff to set the number of records displayed when OPAC visitors performed searches.
The new 'Records per page' table in the in Brief Display section of the OPAC HTML Configurator allows staff to set both the default number of records displayed while performing searches at OPAC, as well as setting additional optional numbers to allow visitors to select from.
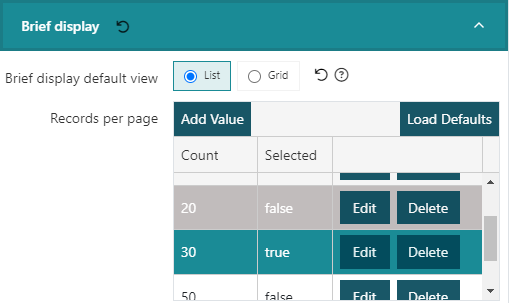
When performing searches from the quick search bar, visitors will see the default 'Selected' number of records per page. If performing searches from any of the search forms (e.g. advanced search), visitors may select the number of records displayed per page in the Options section at the bottom of the search form. Any of the options added to the 'Records per page' table may be selected.
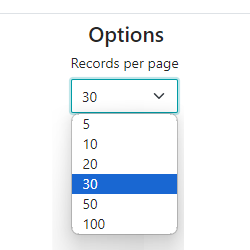
To set the Records per page options, staff must perform following steps:
- Navigate to Maintenance > OPAC & Enquiry >OPAC HTML Configurator
- On the General tab, expand the Brief Display section.
- To add a new value, click Add Value at the top of the 'Records per page' table.
- Set the number of records
- If this is intended to be the default number of records displayed at an OPAC search, check the Selected box
- Click OK to add this row to the table, or Cancel to not proceed
- To add further values, repeat step 3.
- To edit any existing values, click the Edit button at the end of the row.
- To delete any values from the table, click the Delete button at the end of the row.
- Click Save or Save & Close.
Once the above settings are saved, they will be reflected when the user performs any search at OPAC.
|
Only one row in the table can be Selected as the default number of records per page. If another row is set to selected=true, the previously selected value will be set to false. |
Add option to configure favicon in OPAC HTML Configurator
Using a favicon on Spydus, library staff can customise the icon that displays on the browser tab when a user visits the OPAC, or displayed when the site is bookmarked.
The image should be in .PNG format, and be a minimum resolution 32x32.
If no image is uploaded as a favicon, the default is the 'S11' logo.
To set the favicon icon:
- Navigate to Maintenance > OPAC & Enquiry > OPAC HTML Configurator.
- Select the Base language and appropriate View (OPAC_WP for Spydus 11 or higher).
- In the Favicon section, click the Select file to browse to the image file on the local drive and upload it, or drag & drop the image to the 'Drop files here to upload' area.
- Click Save or Save & Close.
|
The site cache must be cleared after upload to display a new favicon (Ctrl+F5). |
Add Additional footer to OPAC HTML Configurator
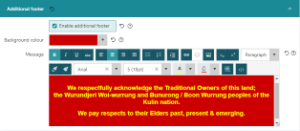
A new Additional footer allows staff to set the message in the OPAC footer, below the existing footer menus.
To add an additional footer message:
- Navigate to Maintenance > OPAC & Enquiry > OPAC HTML Configurator.
- Select Base language and View (OPAC_WP for Spydus 11 or higher).
- Select the Footer tab then expand the Additional footer section.
- Check Enable additional footer
- Set the Background colour
- Compose the desired message in the rich text editor
- Click Save or Save & Close.
|
Mailchimp settings added to Third-Party Settings
It is now possible to configure Mailchimp API integration in Spydus.
To add your Mailchimp API key and List Id to allow subscribe/unsubscribe actions in Circulation:
- Navigate to Maintenance > General > Third-Party Settings.
- In the Mailchimp section, provide an API key and List ID.
- If you don't know your Mailchimp API key, see Mailchimp's About API Keys page
- Spydus currently only supports subscribing to a single List ID
- Click Save or Save & Close.
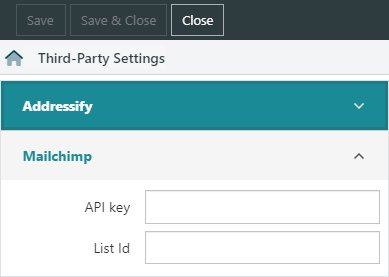
Once the API key & List Id are configured, borrowers with an email address may be subscribed or unsubscribed from your Mailchimp list in the Circulation module.
Customisation of OPAC request forms
Custom request forms
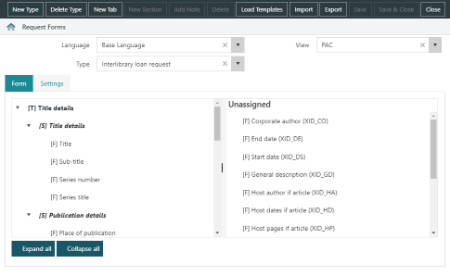
Library staff may now create custom forms for all request types for OPAC visitors. These forms are customised using a similar interface to borrower registration, assigning or unassigned fields as required, controlling mandatory fields, text labels for the fields, as well as validation messages, help and placeholder text.
Follow the steps below to create request forms:
- Navigate to Maintenance > OPAC & Enquiry > Request Forms
- Click the New Type button in the action bar.
- Enter a Type code and select Template from the existing template list.
- The Template selection is not mandatory, but will pre-populate some tabs, section and fields based to the Assigned fields based on the request type
- If Template is left null, all fields will be Unassigned and the form must be built from scratch
- Click OK to create the new form
- Once created, use the Form tab to create Tabs and Sections to organise your form.
- Click New Tab or New Section in the action bar to create
- Each Tab will be a separate page in the form
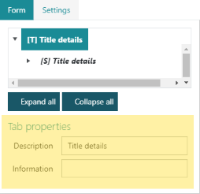
- Set the Tab properties (each Tab must have a Title, and may have an optional plain text Information box displayed at the top of page)
- Each Tab may contain multiple Sections
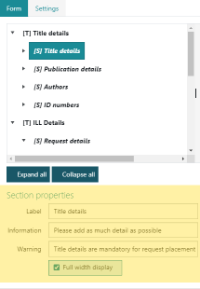
- Create or edit any Sections and set the Section properties
- Each Section may have a Label, a descriptive Information box and Warning text
- The Full width display checkbox allows a section to occupy the full page width
- If un-checked, up to three sections will be displayed on the same row
- Drag and drop and Fields into the required Sections
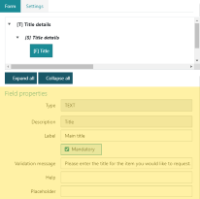
- Configure the required Field properties
- Each Field may have a Label, be flagged as Mandatory, and display assistive text fields & placeholders (these message names differ based on the data type in the field e.g. text, dropdown menu)
- Once all Tabs, Sections, and Fields are organised as desired, click the Settings tab to configure additional form behaviours.
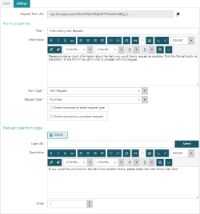
- Under the Form properties heading, the following may be configured;
- The Request form URL field provides the relative URL to this form, this can be added to links or containers as required
- The Title will be displayed in the form and browser tab heading
- The rich-text Information field will be displayed at the top of each page in the form
- If pre-set here, the Form type and Request type will be applied to any requests logged using this form
- If Enable borrower to select request type is checked, the Form type and Request type will be pre-selected in this form, but the borrower will be offered radio button selections to change the request type
- For Purchase requests, staff may Enable anonymous purchase requests to be placed by OPAC visitors who are not logged in
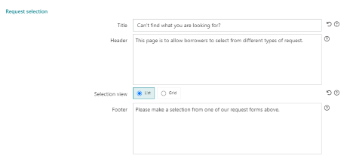
- Under the Request selection page heading, configure what information about this form will be displayed on the Request selection page
- The Display checkbox determines if this form will be displayed or suppressed on the Request selection page
- The Logo URL field allows staff to select an image from (or upload an image to) the OPAC File Manager to use as a logo on the Request selection page
- The Description field allows staff to compose a rich-text description of this form for display on the Reuqest selection page
- The Order value sets this form's position on the Request selection page (1 at the top of the page)
- Click Save or Save & Close.
Request selection page
Instead of linking directly to request forms, staff may opt to link to a request selection page, where borrowers can decide what type of request they would like to place. The URL to the request selection page is /cgi-bin/spydus.exe/MSGTRN/OPAC/REQSEL
To configure the request selection page:
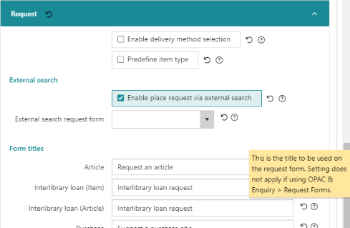
Enable or disable ILL request placement from 'External search' results
If enabled, vistors to the OPAC can perform an external search where they can search for items from other libraries. From Spydus 10.7, OPAC visitors would be presented the option to Place Request for an inter-library loan at the Brief & Full Display of records returned by external search. From 2024R2 libraries may enable or disable the ability of visitors to place an ILL request from external search results at the OPAC.
To enable or disable placing an ILL request via external search:
- Navigate to Maintenance >OPAC & Enquiry > OPAC HTML Configurator.
- On the General tab, expand the Request section.
- Check or un-check the Enable place request via external search box.
- If enabled, the External search request form dropdown will be revealed, allowing staff to select a custom request form
- If no custom form is selected (i.e. dropdown is left null) the default item request form will be used
- Click Save or Save & Close.
Update description of existing OPAC request parameters
As covered above, Spydus introduced the new feature of creating customised request forms for OPAC. Staff can now create separate request forms with different templates that will be displayed at OPAC, and users can place requests via those request forms.
Due to the ability of staff to set these parameters per form with the new feature, parameters that apply to the 'out-of-the-box' request forms will not apply to custom request forms. Text has been added to the descriptions of applicable parameters to ensure staff are aware of where these parameters will and will not be applied.
e.g. Per the screenshot below, as custom request forms each have their own title field the Form titles applied to the standard request forms will not be used for custom forms
This text will be displayed as tooltip at following places:
OPAC & Enquiry > OPAC HTML Configurator > General > Request section
Maintenance > Requests > General Parameters
Add custom facets to Search Parameters
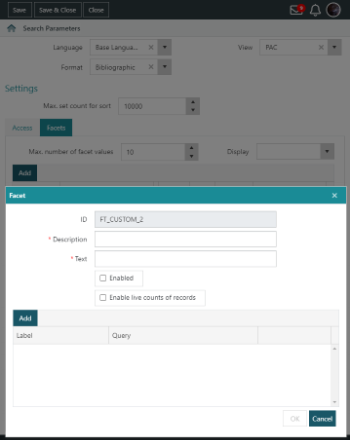
Spydus now allows staff to create custom facets for Enquiry and OPAC searches for refine results. The user can create the facets and facets values for every search form available in Search Parameters.
To add a custom facets for a search form:
- Navigate to Maintenance > OPAC & Enquiry > Search Parameters.
- Select the required View
- Select Staff (CAT) to add facets for Enquiry module searches
- Select PAC (OPAC) to add facets to OPAC searches
- Select the required Format
- BIBENQ for Bibliographic searches
- ALLENQ for All Resources searches
- WRKENQ for Work searches
- ALLWORK for All Resources including Work searches
- Select the Facets tab.
- Click the Add button and fill in the required details
- The facet ID for all custom facets will be FT_CUSTOM_X, where X is an incrementing number
- The Description field should provide information on what the facet is refining on e.g. XDA type
- The Text field is as the facet label (might use this to differentiate from industry or Spydus terms in 'Description') e.g. eContent format
- Set Enabled flag if the facet is to be shown immediately on save
- Set Enable live counts of records if the facet should display how many records have been found for each facet value
- Click the Add button to add a facet value
- Enter the Label
- This is the text that will appear in the facet for this value e.g. eAudiobook
- Enter the Query
- This is the boolean query that will refine the existing search results e.g. BIBITM> (ITMXDATYP: A)
- Repeat step 6 for each desired facet value
- Enter the Label
- Order facet values as desired by dragging and dropping in the facet value list.
- Once all facet values have been added and ordered, click OK.
- In the list of facets for the search Format, select your facet/s and click Move Up or Move Down (or drag and drop) to position them in the facet list
- Their place in this list will determine their place in the facest list at search results
- If the Available Item/Online Item and/or Added facets are enabled in the OPAC HTML Configurator, these will be displayed above all other facets custom or otherwise
- Their place in this list will determine their place in the facest list at search results
- Click Save or Save & Close.
|
If using facets to refine on a property that belongs to a record type other than the record type returned by the query, ensure that the query translates appropriately.
|
Create an additional section to display on search forms in Enquiry
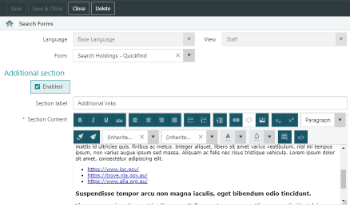
Spydus now allows users to add an additional section to the bottom the any Enquiry search form. The idea is to provide additional information at the search bar with custom content, hyperlinks, and images.
This feature was implemented to support customisations that library staff had made in search form XSL files in previous versions of Spydus.
To add additional section at enquiry search, staff should perform the following steps:
- Navigate to Maintenance >OPAC & Enquiry >Search Forms.
- Select the required search form from the Forms dropdown menu.
- Check the Enabled checkbox to display the section at search forms.
- Enter a Section label to be displayed as a header/title to the section
- Click into the Section content field to compose the section in rich-text or HTML
- Click Save or Save & Close.
|
Once saved, the Additional section will be displayed at the bottom of the selected search form anywhere that form is used in the Spydus staff apps (e.g. the same Acquisitions - Orders search form will be used in Enquiry or Acqusitions modules). |
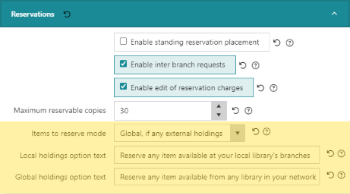
Additional options for reservation placement in a consortium
For libraries operating as part of a consortium that also allow reservation placement on global holdings, some additional parameters have been implemented to control the behaviour of these reservations at both the OPAC and in the staff apps.
To configure the behaviour of reservations placed in a consortium when performing a global search:
- Navigate to Maintenance and expand the OPAC & Enquiry menu
- For staff reservation behaviour, select Enquiry HTML Configurator, on the General tab expand the Reservation section
- For OPAC reservation behaviour, select OPAC HTML Configurator, on the General tab expand the Reservation section
- Set the Items to reserve mode dropdown
- Global, if any external holdings will place a global reservation if there are any external holdings (i.e. a local reservation will only be placed if the title has only local holdings)
- Local, if any local holdings will place a local reservation if there are any local holdings (i.e. a global reservation will only be placed if a title has only external holdings)
- Global only will always place a global reservation, even if there are no external holdings
- Set the Local holdings option text
- This text will display in the Items to reserve dropdown when placing a local reservation
- Use the {INSTDESC} placeholder to insert the local institution name (INSTDESC uses the institution description in the INS lookup table in Table Manager and this cannot be changed from the front end - please contact Civica staff if it is required to update the institution description in Table Manager)
- Set the Global holdings option text
- This text will display in the Items to reserve dropdown when placing a global reservation
- Use the {NETWORKDESC} placeholder to insert the network name of the consortium (this can be set in the Network description field in the Global/Consortium section of the the Enquiry HTML Configurator for staff apps, or the OPAC HTML Configurator for the OPAC)
- For OPAC reservations, additionally set the Global holdings checkbox text
- As above, the {NETWORKDESC} placeholder may be used to insert the network name of the consortium
- This text will be displayed when placing a global multi-title reservation, where at least one of the titles has holdings at another institution
- Depending on the configuration of the Circulation General Parameter Global reservations - select institution first, this text may be shown either beside a checkbox, or standalone
- Click Save or Save & Close.
